Monday, 23 September 2013

Duck Cushions

These were made as a Christmas present for my mother. My parents were in the middle of building an extension to their house and the new downstairs room (now called the 'porch' although it's large enough to be another lounge) had very little in it. The walls had been painted yellow and there was talk of getting a sofa for it, so I made these to go with the existing colour scheme


Cute, aren't they? I thought so too, and so did my mother (thankfully!). I chose ducks because my mother thinks they are adorable, and I can't fault her judgement there! I didn't want to make them identical, so mirrored the ducks and swapped the yellow fabrics over in the second one. I still can't tell which way round I prefer. Possibly the one on the right? Who even knows...


Tadaa! A zip to make it easier to clean the cover! It's almost like a professional cushion cover! The zip was stitched in by hand because that seemed to be the best way to keep it looking so neat. The cushion pad inside was bought from a local homeware store I think...


Plain white material on the back to match the front middle square. Really this is a ridiculously simple yet good looking design!


Aaand one of the little duckies! I learnt blanket stitch for this project to keep the edges from going horrible and to add a touch of class. The duck was then hand stitched on in yellow which you can't see because I was a genius and hid the stitches! Ahahaha!

In Summary

I actually can't think of a single thing about these cushions I am unhappy with. And that's pretty much a first.
My mother was pleased with them, so I completed my brief
I am happy I learnt a new stitch! Always love it when a project teaches me something new.
These cushions are so easy to make. I could literally make a dozen in an afternoon I think. 
I am happy with these. And happy I decided to write a post about them and remind myself that sometimes, everything works out, and I have enough time, fabric and thread to make it as perfect as I ever could

Tuesday, 17 September 2013

Red top

This was, I think, my first ever self-patterned top. Although I'm not entirely sure it deserves that title. I have a very similar one in green that I bought in Camden. But I did create the pattern all by myself, even if I did use the green top for inspiration. And it took lots of trial and error and wasted paper to get to an actual working pattern


To be fair, I was genuinely just overjoyed that this thing even fit at all when I wore it. I had been convinced that it never would but hey, I surprised myself! It actually fits pretty well. The neckline is slightly less wide than the inspirations one was, because I felt slightly uncomfortable with such a wide neckline.

One thing I'm not proud of is my choice of lacey edging. I had no idea how badly the silver lace would react to being washed, even by hand, and it curled up and stopped looking as stunning as it had done at the start, after only one wash. In future, I wouldn't use a metallic lace at all, but only softer ones. Probably in black.


I do like my change to the hemline, making it go down slightly more at the back than at the front. The original was straight across all round, but this just makes it a bit nicer I think. 
Crushed velour seemed like the natural fabric for an awesome gothy top, and it definitely looked right in the end. I'm always unsure with crushed velour, but I'm figuring out bit by bit ways to use it and not feel like it looks cheap and tacky. It's all about what you use it for, and then finishing it right with edging, or something like that.


This top would be awesome with a black underbust corset (sadly mine is kinda broken), but does not work for clubbing, because the fabric holds heat a lot better than you might expect for how thin it feels. Or it can be a more casual top with jeans, like in these photos. Or with a black skirt/trousers. It's pretty versatile actually!


In Summary
Woo I made a thing! All by myself!
Different edging would have been better.
I like jewel tones of fabrics
Crushed velour is actually really nice to work with
I have a LOT of crushed velour. I might be able to make more of these...
Fake corset lacing at the back might set it off nicely
I feel like it's actually not un-flattering to my shape - which I hate, so that's another plus!

Saturday, 14 September 2013

Russian flag bag

This was actually made quite a few years ago. It was for a cosplay, and for various reasons, the Russian flag was something the character liked. Cosplay is always difficult with bags - you need money and stuff, but you don't want a bag to ruin the effect of your pretty costume. That was why I decided to make a bag that would work if caught on camera. And here it is!


It is entirely made of cotton, for the very sensible reason that cotton was the only material I had all three colours in. Also, it's light and easy to work with. As you can see, the strap, also cotton, was two toned, with white on the outside and red on the inside. I mocked up an entirely white one and it just looked weird, so I added the red layer and it looked a lot better! Same red as on the flag of course. I actually ironed the entire bag before these photos - two years stuffed at the back of a shelf is not good for anything! The strap was particularly badly off. Next time I make a bag like this, I will use a thicker material, or add a layer of interfacing in the strap to try and stop it from scrunching so much.


Zip along the top! White, to blend with the flag. Blue thread because... I ran out of white. Turned out I had less than I thought. Still annoyed about this. It's a tiny flaw my perfectionist mind won't let go... But I had no money to go get more thread at that point so eh. I had to make do.


The lining! I was so, so proud of myself for this! I figured out all by myself how to do it neatly and prettily! I may have gone round to all my friends after I'd made it, and showed them the bag, saying 'Hey look! Lining!!!'... none of them got why this was exciting... Anyways. The terrible blue thread from the previous photo is not visible on the inside... because it's not there! I figured out (all by myself) that it would be much better to use two colours of thread in the sewing machine, one from the top, one from the bottom. So the inside was sewn with red. Which makes me a lot happier than if it had been blue too.


The length of the strap had been awkward to figure out too - I didn't own many bags in those days. That was done mainly by trial and error in the end. It turned out good!

In Summary

I really, really need to make sure I have the correct threads for things
This was an excellent learning project
Thicker fabric for strap
Practise adding pockets inside the bag
For once, I actually started making this a whole week before I needed it, and had it finished within a day of starting it. That made for less errors or making do than usual. Except the financial-caused ones...
Overall, very proud of this piece. Definitely going to be making other bags in this style over the next few months

And now, I guess I'd better stop going over old projects and deal with the one currently spread out on my floor! (which I am super excited about being able to show you in the next week or so... hopefully...)

Tuesday, 10 September 2013

Nyancat

A bit of a break from clothing, here is Nyancat from the famous viral video! This is one of my favourite things that I have made. I made it while suffering from insomnia in Japan, and stayed up for three days designing and handsewing it - my sewing machine there was incredibly cheap and failed me when it came to felt - plus it was too loud to use at night.


I am insanely proud of this because of how accurate it is to the original. Seriously, each of the poptart dots were carefully mapped out to match to the original. The end result is super cute and all!

Obviously, there is no pattern out there for something like this, so it was patterned from start to finish by yours truly. I used scrap paper and sellotape and was very happy to get the proportions right and everything :)

You can see the feet looking a bit weird and sticky-out. Next time I would cut little indents in the bottom rectangle so that they could go straight down, but I didn't realise that would be a problem until it was finished. It still stands up on it's own though, so yay for that!

In Summary
Insomnia can lead to being massively creative.
I'm a bit too much of a perfectionist at times
I now want to make a Nyancat bag and a Nyancat pillow (with a rainbow fleecey blanket attached...)
Patterning and making something entirely by yourself is incredibly rewarding!
I am really proud of this plushie
Next time I might make the base of the ears a bit wider. I didn't realise how much they'd shrink when the face was turned inside out.

Only a short post today. I'm running out of quality things to show off, so I'm going to have to get a move on with making new things to talk about!

Thursday, 5 September 2013

Harley Quinn dress

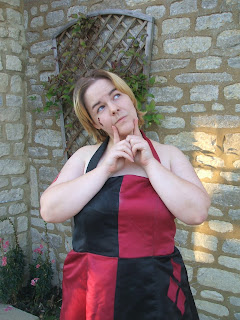
At last! The moment you have all been waiting for! Except you probably haven't, but meh. Behold the glory of my Harley Quinn inspired cocktail dress!


Kay, first of all please ignore the weird poses I pull. I am not an actual model (despite my stunning good looks) and therefore have no idea what I'm doing when a camera is pointed at me. Sometimes it ends well, sometimes it ends in poses like this...
Anyways, this post is supposed to be about the dress, so onwards! It was designed for a clubbing night with a circus theme so me and my boyfriend went as Harley and the Joker. An obvious choice. I designed this dress to be a clubbing appropriate variant on Harley's clothes. It is entirely made of Duchesse Satin (which is a gorgeous material) except for the lining, which is a basic satiny lining.


One thing I'm still not sure about was whether I put the horizontal split too low. Originally I had planned to have it just under the bust, but that looked weird with the mockup so I moved it to where is is now. At the time I thought it was perfect, but looking at it now my perfectionist brain is slightly bothered by it... still no idea why...
Anyways, on each skirt quarter are three diamonds, though you can't see the black ones so well. These were of the same material, and were appliqued on with a zigzag stitch around the edges.
Oh, and this was not entirely patterned by me. I mean, the halterneck and the quartering were planned and patterned by me, but the basic dress shape was based on a commercial pattern I have lurking around somewhere.


Now, this was why the horizontal split was at that point. It's where my hands rest naturally and so looked best there. I think. I'll debate that mentally until all turns to ash, I suspect! Also, another weird pose... sorry...
The halterneck was actually a fairly last minute addition. I had though about adding it, but decided not to until I tried on the unlined dress and realised it needed something a bit more. This was particularly helpful now, as I have lost enough weight since making it that I need the halterneck until I have time to adjust the dress to fit me again.


Wooo, adorable closeup! You can kinda tell it doesn't fit me so well anymore, which is sad, though also a triumph.
Oh, the bodice part has princess seams, as all the cutest dresses do. I have sewn so many princess seams in my life by now that I'm getting really quite good at them


You might be able to make out the zip down the back. I was very happy with how neatly I was able to stitch that in. Also, the dress could do with a bit of an ironing, but I didn't realise that til I saw these pictures. Ah well.
The halterneck ties behind my neck, as you can see. It was in a bow when I wore it out, but I have since discovered it looks better in a simple knot, as it is here.

In Summary
I am really, really happy with this dress. I took it from sketch to finished and wearing in two days, without leaving any bits not finished or bodged (well, not really)
Still not sure about the horizontal split...
Princess seams get easier every day
The zip was also easier than zips I have done in the past. This pleases me.
I really like not sewing arms onto things. I might never have attached sleeves again. (except I guess the challenge is good...)
I need to learn how to model the stuff I make better
This dress really is super comfy. I need to adjust it so it fits me again so that I can wear it more. Cos It's probably one of the best things I've made to date


Wednesday, 4 September 2013

Saber Cosplay

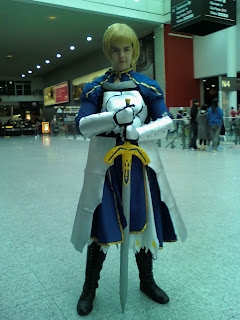
This post would have been about my Harley Quinn dress, but I haven't gotten round to uploading the photos yet... so I decided to do one about another past outfit. This was my first ever cosplay that I actually made. All my other cosplays have been bought. Saber, from the anime Fate/Stay Night is my favourite character pretty much of anyone ever, so it was worth the effort to make her outfit myself. And here's the final product!


You need to ignore the wig, because the correct one didn't get delivered until the day after the con, so this was a normal blonde one that I tried (and failed) to style. Still, I look snazzy, right?
The outfit, although designed by the creator of the anime was patterned and made entirely by myself. This was one of the first times I did a proper mockup of something in cheap fabric as a test. I think I used the lining material from some old curtains. The white you can see in the skirt is actually an entire underdress because, even though other people couldn't see it was there, I needed to make the outfit as authentic as possible, and the character occasionally doesn't wear armour, allowing me to figure out that it was a separate white dress.
I tend to be fairly detailed orientated/a perfectionist, so all round the bottom of the white dress is that weird ziggy pattern with the yellow detailing, because that's what the character has, so even if no one sees it round the back, I was not going to risk that, or let it not be as perfect as I could.
There were so many bodged bits of this outfit, and 'make do' bits. Like when I ran out of gold ribbon the night before the con, and so used green for the rest of the edging then painted it gold...
This all taught me a lot about starting early and not wasting time. It was alright for cosplay to have only the look of the thing - it was only ever worn once, but for actual clothes I realised I'd have to do a lot better.


The armour was made following a tutorial which can be found here. It's a really brilliant tutorial that I would definitely recommend to anyone looking at trying to make their own cosplay armour. Foam is easy to work with comparatively to some materials, and if you follow the tutorial properly (which I did not) then it ends up looking amazing.

The tassets (skirt armour) made it highly inconvenient to sit down, and the breastplate was a nightmare with all the fiddly bits. When I redo this outfit, I will make a full breastplate out of black foam, then do the silver over the top, rather than trying to attach silver armour pieces to black fabric.
The gauntlets were awesome though, and came out looking so brilliant and made me super happy and proud. Though the finger armour was weird and ended up being sewn piece by piece to black knitted gloves. The look worked, but it was tedious.
The boots were supposed to be armoured too, but I was running out of time, and had no money to buy a second pair of boots that could be sacrificed to the gluegun. The plain boots looked alright though.


So, what were the flaws in my armour? Well, as usual, I was rushing to get it all done,and ended up not having enough days to properly seal the foam, which made it harder to spray paint and more flimsy than I would have liked. That meant that two years and three moves later, it is all completely destroyed. Which is sad. It did look awesome on the day though.


This was actually the bit of my cosplay I was most proud of. I like making cosplay swords, and Excalibur came out looking amazing! The sword is pine, with airdry fimo for the detailing. Seriously proud of it :)

In Summary:
I need to start things a LOT earlier to make sure I have time to finish things properly
It's always best to make something as durable as possible - imagine you're making it to be worn every single day for the next two weeks - it's not enough for it just to look pretty for one day. It has to survive life, and be comfortable.
I can do this whole patterning thing. It will just take a bit more practise
I love making swords. I want to make more swords...
Making mistakes is good - I learnt a LOT from all the mistakes I made with this outfit. And very few of those mistakes are ones I have repeated. Which is good.
Next time I make armour I will try out Wonderflex. Which is apparently amazing and awesome and creates very pretty things.

Tuesday, 3 September 2013

Red Dress!

So this post will be fairly short. Mainly because I just posted a longer one. But also because I actually only have one decent photo of the next item. More may be taken at some point, but for now this is it.


So this is one of the few things I have made which is entirely mine, even from pattern. Most things I make have a commercial pattern at the base, which I then adapt and change to suit my purposes, what with not quite being at a high enough level to pattern stuff entirely myself. This one, however, was designed, patterned and made by me. Which means I'm kind of annoyed I don't have better pictures...
The black top and skirt are not part of the dress and so were not made by me. One day I'll make my own and have the entire outfit handmade.

So, the dress itself. It is of a very stretchy lycra-based material. Which was a nightmare to sew, really. I learnt a lot about zigzag stitch through sewing this dress.
It does up under the bust with five pairs of ribbons tied in bows, and at the neck with a single concealed button. Just under the bust is a black silk rose lightly stitched on.
There is matching black lace on the hem of the skirt and on the sleeves.
The sleeves are of an interesting design. I always like interesting sleeves, and came up with this design while sketch-planning the dress. There is also a concealed pocket in the left sleeve for such things as an oyster card, money, ID etc, because this was designed for an evening out and I didn't want the trouble of a bag.

In Summary:
Stretchy fabrics are HORRIBLE even though they look lovely in the end
The fabric was actually quite thick, which makes it drape beautifully but means this is a winter-only dress.
I need to practise zig-zag stitch more
More photos required!
All in all though, I feel very proud of this dress. It was finished in time, was pretty and durable and everything I needed it to be

Elf dress!

So, anyone who knows me, will know that my main hobby is LARPing. This is a cross between historical re-enactment and all the epic fantasy stories you have ever read. You can therefore imagine that for such a cool setting, you need awesome clothing. That's where this post comes in. Two years ago, shortly after starting a new character, I realised I had no cool clothes for her and no money to buy them. So I set about my most ambitious project up til that point - making a medieval style dress.And here it is:


The main dress was made from some taffeta I had lurking about. It is a gorgeous material and fairly easy to sew. I had intended to make the sleeves out of the same, but didn't have enough. Working to a budget as I was, I searched through my magical fabric box of wonders, and found some gauzy material in an appropriate colour.


My character is an elf. Clearly the coolest race. Also v necklines are awesome. This one was trimmed with some gold ribbon I had lying about. This was my first introduction to the effect trimmings have on making something look finished. The sleeves are also trimmed with the same ribbon


The belt was for Reasons - namely having somewhere to attach a sword, pouch, and any other items essential to such an awesome Hero :D


Eyelets are fun! There's nothing like hitting fabric with a hammer to take out your frustrations! It's not completely smooth and even, mainly due to me being slightly larger than I'd like, but meh, it did up and worked amazingly!

In Summary:
This was a difficult project, because it was my first time of making a whole outfit like this.
The eyelets looked awesome but were tiresome to do up every morning - in future I'd keep them, but add a zip under the arm to make it easier to put on and take off
I actually hate that gauzy material I used for the sleeves. Next time I'd make sure to have enough taffeta for the whole thing.
Also next time I'd add more embellishment. Embroidery or beads or something
However, it did look awesome, and flouncing round the field as a pretty elf was really very cool indeed.